Tutorial 2 - Wireless Network
Overview
This tutorial will cover the use of a 3 node scenario in CORE. Then running a chat server on one node and a chat client on the other. The client will send a simple message and the server will log receipt of the message.
Files
Below is the list of files used for this tutorial.
- 3 node CORE xml scenario file (wireless)
- /opt/core/share/tutorials/tutorial2/scenario.xml
- 3 node CORE gRPC python script (wireless)
- /opt/core/share/tutorials/tutorial2/scenario.py
Running with the XML Scenario File
This section will cover running this sample tutorial using the XML scenario file, leveraging an NS2 mobility file.
- Make sure the core-daemon is running a terminal
sudo core-daemon - In another terminal run the GUI
core-gui - In the GUI menu bar select File->Open...
- Navigate to and select this tutorials scenario.xml file
-
You can now click play to start the session
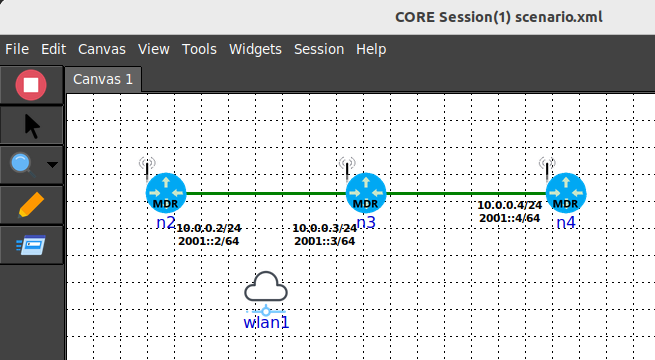
-
Note that OSPF routing protocol is included in the scenario to provide routes to other nodes, as they are discovered
- Double click node n4 to open a terminal and ping node n2
ping  -c 2 10.0.0.2
PING 10.0.0.2 (10.0.0.2) 56(84) bytes of data.
64 bytes from 10.0.0.2: icmp_seq=1 ttl=63 time=20.2 ms
64 bytes from 10.0.0.2: icmp_seq=2 ttl=63 time=20.2 ms

--- 10.0.0.2 ping statistics ---
2 packets transmitted, 2 received, 0% packet loss, time 1000ms
rtt min/avg/max/mdev = 20.168/20.173/20.178/0.005 ms
Configuring Delay
-
Right click on the wlan1 node and select WLAN Config, then set delay to 500000
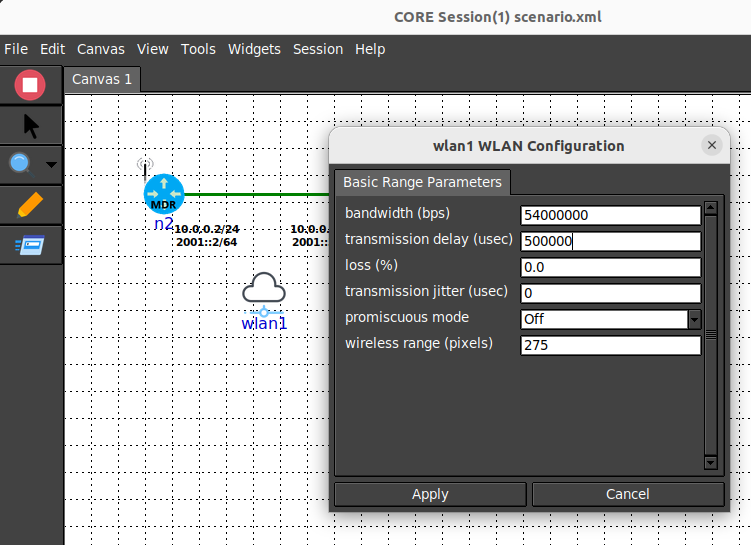
-
Using the open terminal for node n4, ping n2 again, expect about 2 seconds delay
ping -c 5 10.0.0.2
64 bytes from 10.0.0.2: icmp_seq=1 ttl=63 time=2001 ms
64 bytes from 10.0.0.2: icmp_seq=2 ttl=63 time=2000 ms
64 bytes from 10.0.0.2: icmp_seq=3 ttl=63 time=2000 ms
64 bytes from 10.0.0.2: icmp_seq=4 ttl=63 time=2000 ms
64 bytes from 10.0.0.2: icmp_seq=5 ttl=63 time=2000 ms

--- 10.0.0.2 ping statistics ---
5 packets transmitted, 5 received, 0% packet loss, time 4024ms
rtt min/avg/max/mdev = 2000.176/2000.438/2001.166/0.376 ms, pipe 2
Configure Loss
-
Right click on the wlan1 node and select WLAN Config, set delay back to 5000 and loss to 10
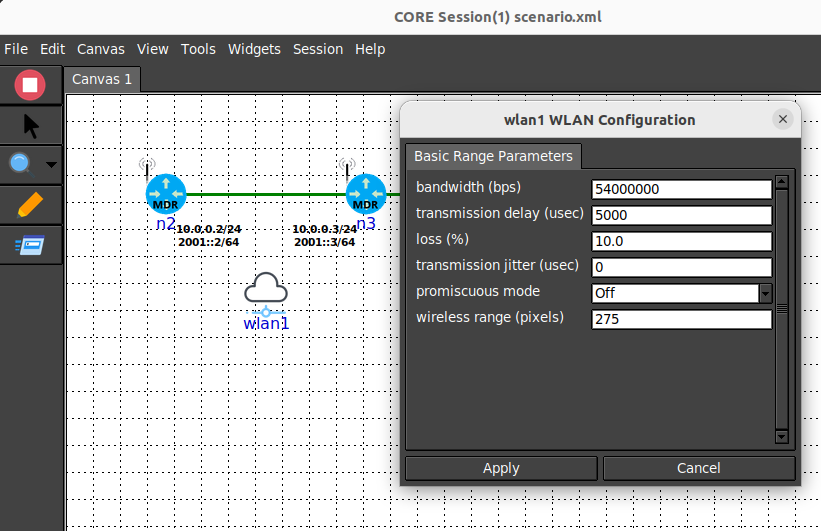
-
Using the open terminal for node n4, ping n2 again, expect to notice considerable loss
ping -c 10 10.0.0.2 PING 10.0.0.2 (10.0.0.2) 56(84) bytes of data. 64 bytes from 10.0.0.2: icmp_seq=1 ttl=63 time=20.4 ms 64 bytes from 10.0.0.2: icmp_seq=2 ttl=63 time=20.5 ms 64 bytes from 10.0.0.2: icmp_seq=3 ttl=63 time=20.2 ms 64 bytes from 10.0.0.2: icmp_seq=4 ttl=63 time=20.8 ms 64 bytes from 10.0.0.2: icmp_seq=5 ttl=63 time=21.9 ms 64 bytes from 10.0.0.2: icmp_seq=8 ttl=63 time=22.7 ms 64 bytes from 10.0.0.2: icmp_seq=9 ttl=63 time=22.4 ms 64 bytes from 10.0.0.2: icmp_seq=10 ttl=63 time=20.3 ms --- 10.0.0.2 ping statistics --- 10 packets transmitted, 8 received, 20% packet loss, time 9064ms rtt min/avg/max/mdev = 20.188/21.143/22.717/0.967 ms - Make sure to set loss back to 0 when done
Running with the gRPC Python Script
This section will cover running this sample tutorial using the gRPC python script and providing mobility over the gRPC interface.
- Make sure the core-daemon is running a terminal
sudo core-daemon - In another terminal run the GUI
core-gui - From another terminal run the scenario.py script
/opt/core/venv/bin/python scenario.py - In the GUI dialog box select the session and click connect
- You will now have joined the already running scenario
Running Software
We will now leverage the installed Chat App software to stand up a server and client within the nodes of our scenario. You can use the bases of the running scenario from either scenario.xml or the scenario.py gRPC script.
- In the GUI double click on node n4, this will bring up a terminal for this node
- In the n4 terminal, run the server
export PATH=$PATH:/usr/local/bin chatapp-server - In the GUI double click on node n2, this will bring up a terminal for this node
- In the n2 terminal, run the client
export PATH=$PATH:/usr/local/bin chatapp-client -a 10.0.0.4 - This will result in n2 connecting to the server
- In the n2 terminal, type a message at the client prompt
>>hello world - Observe that text typed at client then appears in the terminal of n4
chat server listening on: :9001
[server] 10.0.0.2:53684 joining
[10.0.0.2:53684] hello world