Tutorial 5 - RJ45 Node
Overview
This tutorial will cover connecting CORE VM to a Windows host machine using a RJ45 node.
Files
Below is the list of files used for this tutorial.
- the scenario with RJ45 unassigned
- /opt/core/share/tutorials/tutorial5/scenario.xml
- grpc script to create the RJ45 in simple CORE scenario
- /opt/core/share/tutorials/tutorial5/scenario.py
- chat app client modified for windows
- /opt/core/share/tutorials/tutorial5/client_for_windows.py
Running with the Saved XML File
This section covers using the saved scenario.xml file to get and up and running.
-
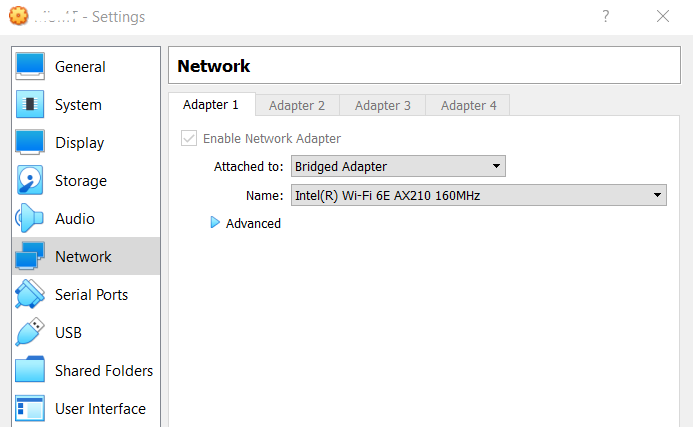
Configure the Windows host VM to have a bridged network adapter
-
Make sure the core-daemon is running in a terminal
sudo core-daemon - In another terminal run the GUI
core-gui -
Open the scenario.xml with the unassigned RJ45 node
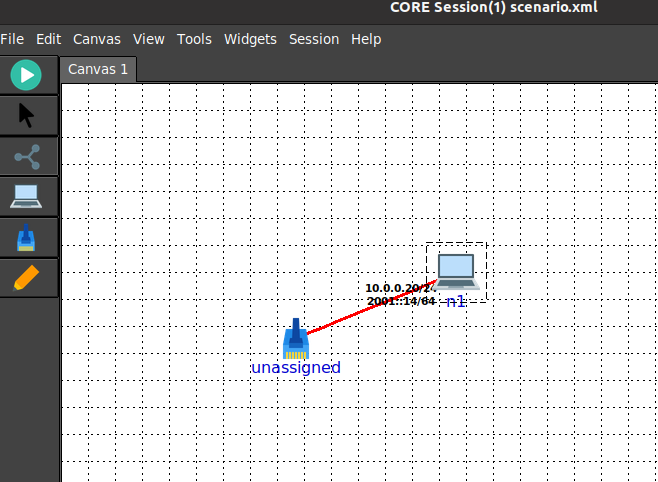
-
Configure the RJ45 node name to use the bridged interface

-
After configuring the RJ45, run the scenario:

-
Double click node n1 to open a terminal and add a route to the Windows host
ip route add 192.168.0.0/24 via 10.0.0.20 - On the Windows host using Windows command prompt with administrator privilege, add a route that uses the interface
connected to the associated interface assigned to the RJ45 node
# if enp0s3 is ssigned 192.168.0.6/24 route add 10.0.0.0 mask 255.255.255.0 192.168.0.6 - Now you should be able to ping from the Windows host to n1
C:\WINDOWS\system32>ping 10.0.0.20 Pinging 10.0.0.20 with 32 bytes of data: Reply from 10.0.0.20: bytes=32 time<1ms TTL=64 Reply from 10.0.0.20: bytes=32 time<1ms TTL=64 Reply from 10.0.0.20: bytes=32 time<1ms TTL=64 Reply from 10.0.0.20: bytes=32 time<1ms TTL=64 Ping statistics for 10.0.0.20: Packets: Sent = 4, Received = 4, Lost = 0 (0% loss) Approximate round trip times in milli-seconds: Minimum = 0ms, Maximum = 0ms, Average = 0ms - After pinging successfully, run the following in the n1 terminal to start the chatapp server
export PATH=$PATH:/usr/local/bin chatapp-server - On the Windows host, run the client_for_windows.py
python3 client_for_windows.py -a 10.0.0.20 connected to server(10.0.0.20:9001) as client(192.168.0.6:49960) >> .Hello WORLD .Hello WORLD Again . - Observe output on n1
chat server listening on: :9001 [server] 192.168.0.6:49960 joining [192.168.0.6:49960] Hello WORLD [192.168.0.6:49960] Hello WORLD Again - When finished, you can stop the CORE scenario and cleanup
- On the Windows host remove the added route
route delete 10.0.0.0
Running with the gRPC Script
This section covers leveraging the gRPC script to get up and running.
-
Configure the Windows host VM to have a bridged network adapter
-
Make sure the core-daemon is running in a terminal
sudo core-daemon - In another terminal run the GUI
core-gui - Run the gRPC script in the VM
# use the desired interface name, in this case enp0s3 /opt/core/venv/bin/python scenario.py enp0s3 -
In the core-gui connect to the running session that was created
-
Double click node n1 to open a terminal and add a route to the Windows host
ip route add 192.168.0.0/24 via 10.0.0.20 - On the Windows host using Windows command prompt with administrator privilege, add a route that uses the interface
connected to the associated interface assigned to the RJ45 node
# if enp0s3 is ssigned 192.168.0.6/24 route add 10.0.0.0 mask 255.255.255.0 192.168.0.6 - Now you should be able to ping from the Windows host to n1
C:\WINDOWS\system32>ping 10.0.0.20 Pinging 10.0.0.20 with 32 bytes of data: Reply from 10.0.0.20: bytes=32 time<1ms TTL=64 Reply from 10.0.0.20: bytes=32 time<1ms TTL=64 Reply from 10.0.0.20: bytes=32 time<1ms TTL=64 Reply from 10.0.0.20: bytes=32 time<1ms TTL=64 Ping statistics for 10.0.0.20: Packets: Sent = 4, Received = 4, Lost = 0 (0% loss) Approximate round trip times in milli-seconds: Minimum = 0ms, Maximum = 0ms, Average = 0ms - After pinging successfully, run the following in the n1 terminal to start the chatapp server
export PATH=$PATH:/usr/local/bin chatapp-server - On the Windows host, run the client_for_windows.py
python3 client_for_windows.py -a 10.0.0.20 connected to server(10.0.0.20:9001) as client(192.168.0.6:49960) >> .Hello WORLD .Hello WORLD Again . - Observe output on n1
chat server listening on: :9001 [server] 192.168.0.6:49960 joining [192.168.0.6:49960] Hello WORLD [192.168.0.6:49960] Hello WORLD Again - When finished, you can stop the CORE scenario and cleanup
- On the Windows host remove the added route
route delete 10.0.0.0